Saturday, September 3, 2011

Underwater Basket Weaving - Turns Out, It's Not That Easy


I was exposed to an entirely new form of crafting last week. One I had miraculously never even considered before: basket weaving. I even drove 5-1/2 hours to try it. IT WAS AWESOME. Yes, it killed my fingers a bit, but it was totally worth it! I went to one of these art classes with my Mom, and we both made baskets.(That's my Mom and me if you hadn't figured that out, yet. Aren't we amazing?!)
An explanation as best I can manage: we wove the bottom of the basket, then we turned up the stakes and wove the top with different kinds of reed. Oh, and we got to cut the tops and do more weaving and then cut more stuff. And we used different colors! My favorite part was the basket feet, though. I LOVE baskets with feet. And also stair baskets, but we didn't make one of those. :( Anyway, as fun as that all sounds, you should definitely try it if you EVER get the chance. I'm pretty sure it won't be my primary hobby (*sad face*), since I have a bazillion other hobbies (how much is a brazilian?), but I will do it whenever I can. (Ooh! That's my basket!)
Actually, today I bought a ton of basket making stuff. I'm amazed at the ways you can use baskets. The basket class was at the instructor's house, and it was fun to find all the baskets she had around the house and all the uses she had found for them. They weren't just baskets. They were magazine holders, tissue boxes, utensil holders, bird nests, hearth baskets and trash cans. Now I want everything to be a basket, and, guess what? I think I can make them all. :)

Sunday, May 15, 2011

New ECS Products! Introducing "The Bunting"

This is something I have always been interested in, and there are so many ways you can make them! Mine, of course, will be made with paper since we are a paperie, and I'm so excited to add them to the shop!
I am one of those people who loves things in miniature (keep your comments to yourself), and these little paper buntings are so cute I had to make one for myself. It does a great job at brightening up my crafting space, which is currently recovering after Hurricane Rayna ran through it. I'd love to get some picture of my craft space up, but that will most likely never happen since I run through my crafting space like a crazy person leaving a trail of cut paper, ribbon and messy adhesives in my wake. Feel free to imagine what it might look like, though. What you can see is the wall I look at when I craft. :) My drafting table is in this corner, and I have access to my crafting lamp and my embellishment center (on the right side of the picture). And then there is the lovely bunting I made for myself out of some of my favorite paper.
These buntings can be made out of all kinds and patterns of paper, and I am currently making them on 5'1" long cotton thread with 1' of blank string on either side for hanging. They can also be tied to skewers on either side and put into a cake! I'm thinking about making a cake just so I can do that. These things are very cool. :)
Go check these out at the shop... Love 'em! *ECS Paper Buntings*

Saturday, May 7, 2011

Happy Mother's Day! And a Sale to Boot...

Good people of the interwebs, Ehle Custom Stationery is having a sale! It is indeed a momentous occasion. :) In honor of all the wonderful mothers out there, we are making our items cheaper! That's always good. This time, it's just for you!

All you need do is go to our online boutique, which you may know very well and you may not, but you can click on the image below to be transported to a world of paper crafting goodness. I've added a lot of stock to get ready for this sale so you should be able to find lots of good stuff. If you see something that is snatched up before you can get it, or if you want a sketchbook made out of paper you saw used for magnets, email me so we can make sure you get the item you want during the sale. The sale is for one day only, and you can only use the coupon code once so I want to make sure you get what you want!
Click on the image above to be taken directly to the Ehle Custom Stationery website. THIS SALE IS FOR ONE DAY ONLY! I don't mean to yell, but that's very important to know. The sale will last the entirety of May 8 give or take a few hours. I think we all know how I am with time restrictions. I'm always fashionably late. Don't wait until the last minute,though...  Be sure to use the coupon code mday50 to get the sale. This will save you 50% off your order of $20 or more. You must use the coupon code to get the sale. If you have any trouble, just contact me and we can get things figured out.

Otherwise, I hope you all have a wonderful Mother's Day, and I'm sending all kinds of good thoughts your way. Here's to Moms!

Friday, April 22, 2011

Ladies and Gentlemen, Let the Freebies Begin!

Come one, come all! The day has finally come for our Water for Elephants Giveaway! Huzzah! This was a fun giveaway for me because 1) ECS loves elephants! and 2) I love themes. :) I am a theme hound, and it was really fun looking for supplies to make this week's giveaway. Here, ladies and germs, is what we are giving away in honor of a fabulous-looking movie, Water for Elephants:
Here we have a set of 5 matchbook notebooks with 15 pages of recycled newsprint paper in them. We've got some cycling elephants, some circus poster taglines and the beautiful trapeze artist alongside her elephant pals (her elephant pals are on the reverse side :)). This one has rules just like the last one did so keep on reading!

Rule #1:
Like Ehle Custom Stationery on Facebook. If you already have, fabulous. This just makes it easier for me to find and notify people when they win. Click the link below to be taken to the ECS facebook fan page:
 Also, by becoming a fan on facebook, that's another way to keep up with the doings of ECS like sales, new products and shows!

Rule #2:
Let me know which act it is that brings or would bring you to the circus. I'll start. I love the animals. The boring ones are okay, but mostly I like the dangerous ones. The elephants with their sharp tusks, the lions and tigers with their man-flesh-eating-ness and the alligators who also eat fleshy men. I love the danger in it. :) Now you. What is your favorite act at the circus?

So leave a comment on this blog post telling me all about your circus habits, and I can't wait to read them! Plus you'll be entered in the drawing. :) Also, if you join the Ehle Custom Stationery Ehlebots, there are discussion boards and other ways to get savings and new product reveals. We've just got all sorts of stuff going on!

The giveaway starts as soon as this is posted (if you're reading it now, that's now!) and ends Sunday night. Joey and I will be picking a winner Monday morning sometime so tune in then to see the winner! Just remember: elephants are our friends, R-Pat and Rees are tremendous actors and unfortunately good-looking people, and, hence, you should go see Water for Elephants. :) Ciao, bellas!   

Friday, April 8, 2011

I Can Yudu, Can You?

I have FINALLY got myself a Yudu. I've been watching these things for a LOOOOONG time, and seeing as there's no way I'm ever buying myself a craft something for $400, I didn't have one. Until yesterday... Being an exclusive member of Michael's email list, I get these awesome coupons from time to time. Yesterday, for ONE DAY ONLY, the Yudus were $99.99! That's hundreds of dollars in savings! I ran right out and got one. I stood right by the Yudus while the lady looked to see if they had any left. She was finally able to scrounge one up, and it was still in the shipping box! I'm still getting shivers thinking how close I was to having to run all around town looking for one of these things. Oooohhh...

Anyway, I got it, brought it home and immediately opened it and started trying to make something. I then proceeded to immediately mess it up. First of all, I'm not entirely taking the blame on this one because the instructions are crap. I should know, instructions are my living. They truly suck. So I effed up the only emulsion sheet I had. Scott had to run out and get one on the way home from work. He's such an awesome husband. :) Then I found out I needed some things that, for some stupid reason, were not included in the box. Okay, check this out. You put emulsion on the screen to make the image. You need emulsion remover to clean the screen of the emulsion ick. THE DAMN YUDU DOESN'T COME WITH EMULSION REMOVER! And I didn't know I needed it until I got the damn thing home and read the instructions. So then I had to run out and get that. :) The good thing is that I was able to find and print a 40% coupon. So there, Michaels. Take that.

So we're now at the point where I have watched several videos online to try to figure out what the heck I'm doing since the directions sucked. I have some new emulsions sheets and emulsion remover now so I can clean the screen I effed up the first time. After all that mess, it was pretty easy to do. I got my screen burned and inked.
The Yudu originally only comes with an adult t-shirt platen so I had to improvise to make this shirt for Joey. It worked just fine, though sticking the back of the shirt to the platen (like you're supposed to) and sticking a piece of cardboard (with double stick tape on the inside of the front and back so the cardboard doesn't move around in the shirt) in the baby tee. I just had to make sure the image on the screen was in the spot I wanted on the shirt.

Then you just make a couple runs over the t-shirt with the ink and you have a screen-printed tee! This one came out super awesome for my first try. The bottom's a little smudgy, but I wasn't sure how much pressure to put on the squeegee when I was pulling the ink through. I didn't push hard enough the first time, and then I lifted the mesh screen to see the shirt. Don't do that. :) So, after that, I made a couple more passes with the ink pushing much harder this time, and it went over it like buttah. I got this design from Michaels. They sell their own art transparencies, but you can also make your own designs. I might have to try making my own next time.

I'll admit I'm slightly concerned about the cost of maintaining my Yudu because emulsion sheets are 2 for $20, and you have to burn a new screen for each image you want. Unless you're doing bulk screenprinting or are an enthusiastic crafter (like myself), I probably wouldn't recommend it. You're essentially paying $10 plus the cost of whatever you're screenprinting. It's up to you whether it's worth it or not, but I just like the idea of making my own designs on t-shirts and such. I LOVE tote bags, and this will be perfect for that. Also, I just had another thought. I can screenprint my own notecard caddies! Holy moley, I love the sound of that idea.

I think Joey liked his new shirt. It made him run around like a crazy person. :) He looks so stylish in his mock designer tee!

Monday, April 4, 2011

Ehle Custom Stationery's First-Ever BLOG GIVEAWAY! (that means free...)

Yes, you read that right. In the spirit of getting my butt in gear and getting back to business, I'm giving away my first-ever prize package. Exciting, right? I'm pretty darn excited about it! Oh, but not only is this a wonderful prize package, it includes a couple exclusive products that aren't even for sale, yet!

But now for the rules. I'm not just going to GIVE it away. You have to do something for it. Don't worry, it's not hard.
  • Rule #1: Like Ehle Custom Stationery on Facebook. Here you can get all sorts of news from ECS and get pics of what is currently in the works. You'll also find some sales announced here from time to time. If you have already liked us, fabulous! If not, I won't make you feel bad, but I will look away while you head on over to Facebook to like us. I'll pretend I didn't notice you hadn't liked us already... (you can click on the image below to go to the Ehle page on Facebook)
  • Rule #2: Leave a comment on this entry letting me know where your notecards go. Where do you send them? If you don't write letters, to whom do you gift them? If you're not in it for the notecards at all, if you're more of a magnet, book or gift tag kind of person, where do they go? I thought it would be fun to know where all my products have been. I can't wait to hear about it!
With that said, I feel like I can now reveal the prize... curtain's being raised, you're on the edge of your seat... ta da!
 For the lucky winner, they receive 3 ECS original design notecards, 2 of which are not in the shop, yet. There is also 1 set of ECS bubble magnets and a lovingly hand-stitched pocket notebook also not in the shop, yet. I had a really fun time choosing what to give away, and these notecards are seriously some of my favorites, the banner one, especially. Here's the breakdown:
  • (1) Thank You Card w/ envelope (invitation size)
  • (1) Hello Friend Banner Card w/ envelope (invitation size)
  • (1) Party Penguin Card w/ handmade self-adhesive envelope
  • (1) 4-piece Creamy Soup Magnet Set
  • (1) Breezy Trees 20 page Pocket Notebook
To recap, in order to win this prize package, you must 1) Like ECS on Facebook (see Rule #1) AND 2) Leave a comment letting me know where your ECS products have been or will go. It's easy, right?! All entries are due by Wednesday, April 6 at midnight. Don't worry about the time zone, I'm sure it'll be close enough. :) On Thursday morning (April 7), I will put all the names in a random drawing, and I'll let Joey pick a name for me. I will do my best to read the name before he tries to eat it.

If you have any questions at all for me, please let me know. I'm really excited about my first giveaway, and I hope you guys have fun with it! Good luck!

Sunday, March 27, 2011

FINALLY!... after 2 whole years...

Yep, that's right... I FINISHED MY SOCKS! After 2+ years of staring at those socks wishing they would just finish themselves, I finally did it! I'll be the first to admit the 1st sock has a few mistakes in it, but I dare you to find them. :) Usually, everything I make has at least 1 mistake in it, and I like to make a 'Where's Waldo' out of it. Fun times. :) The 2nd sock is gloriously flawless, of course. It's taken this long to make them so one would hope I've learned something since then.

I got this pattern from a book called Sock Innovation by Cookie A. Cookie is a nutcase. She designs all these whacked-out socks for the fun of it! She also tries to teach the reader to design like she does, but I'd sooner stick a pole in my eye. Her designs are incredibly cable-intensive as you can see from the pattern I did. Most of them look like that. I'd rather torture myself making them than designing them. Making them is the fun part, anyway.
 Looking at these socks from any angle shows something different. There are 2 sets of cables that wrap around the fronts and sides of the socks and one entirely separate cable that goes down the back. I made these out of some great yarn from Knit Picks (that they don't make anymore, argh) that is 75% merino wool and 25% nylon. Talk about heaven on my feet. :) Oh, and when looking at these pictures, please be sure to ignore my fabulously pasty white legs. And, yes, I glow in the dark.
Ooh, in this one, I even blend in with the white wall! But, wait, ignore that, please. You see nothing! In short, I friggin' love these socks. I have a pair of ballet slippers that I absolutely hated it when you could see my socks through the top. These new socks look great showing through the top. As a matter of fact, today I wore these out and deliberately made them visible. Look at me and my fashion sense go!
Despite the fact that this Cookie woman is gloriously mad, I have plans to make more of her socks. Of course, the next pair I make will also be for ME as I am putting in the work. I'm being selfish, but with these patterns, I feel I deserve it. Then I have the inevitable birthday and 'something' presents that I make up because I just want to make more socks. This has been the longest 2-whatever years of my life, but I deserve these socks! I worked hard for them. :)

Thursday, March 17, 2011

Etsy Rocks My World: Serpenthes

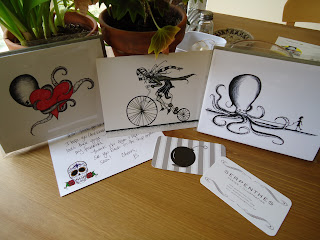
I got my etsy order yesterday! It's only 1 of 2, but I was really looking forward to this one. You may think it strange that I ordered notecards since I make them, but I do have a couple reasons for that. One, it's no fun making a card and then immediately using it. Second, I love it when I share a hobby with someone. Plus, there are just some people out there with wicked awesome designs. And that brings me to Serpenthes! She has the most amazing illustrations that I just had to buy some cards. I bought 2 sets, and they have the coolest octopus images on them. I still can't believe someone can draw like.
Even the note she sent me has a great illustration of the day of the dead! Even her business cards are a work of art. I was just blown away by what I got. Ooh, she also sent me a free gift! I got the postcard in the middle of the steampunk girl on her bicycle, which was GREAT because I was looking at buying that one, too, but it was only available in print form. I will remind you that one of the great things about etsy is custom orders! Probably about 50% of my orders have been customized for what I want. The octopus with the heart was a regular listing, but I asked for a custom order of the girl walking her pet octopus (that's me, by the way ;)). Serpenthes had a collection called Animal Variety Show that included people and their quirky pets, like this one. While I did like the other ones, I could NOT get enough of that little girl walking her octopus. I had to have it. Lots of it. A whole set dedicated just to them!
Needless to say, I will DEFINITELY be getting more cards from Serpenthes, and some of you will, no doubt, be seeing them firsthand! I've already sent one out. These are definitely some notecards you canNOT get anywhere else! And that's what I love about etsy. Etsy makes you the cool kid in school. :) No one will ever be wearing the same dress to the prom because we got ours from etsy.

If you are interested in some of Serpenthes' artwork, as I know you are after that GLOWING review, check out her etsy shop at Serpenthes' Etsy Shop. She's got some wonderful artwork and notecards, and she has some great invitations. I wish I had known about those octopus wedding invitations and save the dates when I got married. They rock. :)

Also, check out the Animal Variety Show collection! I'm seriously thinking about getting that one now that I have Wanda and Sid. That's what I named them. :)

Wednesday, March 16, 2011

Hockey Season is Over...

Let me start by clarifying that I'm talking about high school hockey. So no smartass remarks.

There. Now that that's out of the way, I had the pleasure of making the invitations for the Big Rapids Cardinals Hockey team's annual awards banquet. Now I'm really starting to branch out in my audience! Those of you who know me know that hockey is my thing. Everyone has a thing, and hockey is a very significant thing to me. So this was definitely a big deal. On top of all that, it's my little brother's hockey team.

Justin (aforementioned little brother) usually plays travel hockey all year (he's been playing since he was a wee laddy), but this year, he got the chance to switch schools and made the high school team! I was so frickin' excited for him. I even made him special Big Rapids Cardinals Hockey cupcakes with his number on them. :) You can see those in my Thanksgiving post, by the way... (hint, hint...)

As you can imagine, I used the team's colors as the base of the design. I used my cricut, as always, and made the beautiful frame shape for the base of the invitation. From there, it was really just figuring out how the wording was going to come out. I did use a couple of cool embellishments to make it look "official", but those were pretty easy. I used a blue satin ribbon and then cut some fancy corners on the text card. I attached the team's logo to the pretty satin ribbon, and voila! You have a beautiful custom-made invitation. :) Did I mention its beauty? Yeah. I'm pretty proud of these.
 So... now that you know where to get your custom-made invitations, I'm sure I'll be hearing from some of you. ;)  If I don't, I suppose we can still be friends. This last picture I just took because I love seeing all the cards I made in a big pile. You might have noticed I like to do that in previous posts. It looks cool. And official. Like I'm mass-producing them or something. But no, they're special. Just for you. ;)

Sunday, March 13, 2011

Boring Craft Day!

I suppose I have some other interesting crafts I could talk about, but I just finished this one. And I want to talk about it. This was really a practical project, and it's pretty rare that I do one of these. We put some new bamboo flooring in Joey's room, and we're working on putting some beautiful teak flooring in our bedroom so we had to do something about our slightly leaky humidifiers. For some reason, they also occasionally leave some yucky powdery stuff on the floor. Ew. Anyway, I didn't want to mess up our floors that we worked so hard on putting in so I came up with these.
They came out of a book of crochet motifs I got for Christmas (Thanks, Sarah!), and I have made tons of them already. It's fun to check them off as I go and note how I used them. So this one is the illustrious humidifier rug. I had to add 4 extra rows because it wasn't big enough for our humidifiers, but it looks great. I love that it looks like a little rug. :) It's a great scrap project, and I chose colors that would match our respective rooms. Ours is the black and grey one. Our room is light grey, and there are various other shades of black and grey throughout. Joey's is green, brown and maroon to match his jungle room. The colors look a little off in that photo, so you'll have to trust me on this one.
This project took all of 30 minutes, and it helps keep our beautiful floors beautiful! We just about broke our backs for these floors. They are getting NOTHING on them. I think Joey approves also. :) No more nosebleeds! Yay!

Friday, March 11, 2011

Good Deeds are Good

It should always make you feel good doing good deeds, and if it doesn't, then you should be ashamed of yourself. I have my thing where I like to do one good deed (or thing, if you will) a day, and this one should at least last me a week or so. I believe in karma so if I do something good for someone, then that should keep the baddies away from me. That makes sense, right? Yes. Moving on...

I knitted up a hat and a pair of mittens for some cute little boy somewhere for a friend of mine. She told me his story, and I had to do it! I'm a sucker for children, emotional stories (be warned if you ever end up watching a chick flick with me) and other such nonsense. I won't bore you with the details, but he needed a little extra warmth and love that can only be given by a handknit hat and pair of mittens.
I got both patterns off ravelry as I love their free patterns, and if it's free it's me. So that was a pretty easy decision there. I changed both patterns a bit as I so often do, and I ended up adding the cute little white stripes to the mittens. I don't know if you can see from the picture, but there is a button on the cuff of each mitten that the mitten-keeper cord is attached to so you can remove it if you choose to do so. I guess not everyone likes mitten-keeper cords, but I think they look pretty darn cute. I have always wondered if they make wearing mittens at all uncomfortable. I guess I'll never know.

The hat was pretty fun to make and also an interesting experience. It started out well because I just had to braid some yarn together. No knitting required! Then it got tricky. It's a fair isle pattern, and I have never ever done that before. Now I know why. It was frickin' exhausting! My yarn was getting all twisted, and I was freaking out thinking my tension was going to be horrible and there were going to be holes all over the darn thing. I was as shocked as you are now that it came out so well. I did take out quite a bit of the fair isle turning it into the solid grey background, but I was working on a deadline, and I was tired of making every single little stitch a different color. It was making me batty. The pom on the top was also a new thing for me. This was the 3rd pom I made. The first 2 sucked so I let Joey play with them a while before he started pulling the yarn out of them and then threw them away. I tried to get him to model the hat, but that didn't work well, either. He kept trying to pull it off while yelling at me for more graham crackers.
All in all, it was a great experience, and I learned some new things about knitting. So here's to doing good things!

On a different note, I've been doing quite a bit of shopping on etsy, lately, and I can't wait to post what I've bought! I'm pretty psyched about them, and I'm mostly writing it down here so I don't forget to blog about it when I get them in the mail in the next few days. Remember, Rayna!

Wednesday, March 9, 2011

Joey has THAT kind of Mom

Yep, that's right. This year, I became the kind of Mom that went a little psycho with the birthday party. It was totally awesome for me, but I fear it may become a little more embarrassing for him as he gets older. I made EVERYTHING. Except for the food. I wouldn't dare do that, but besides the food, I made every thing. I mailed out invitations (I made!) a couple weeks before the party, and our theme was monsters. For those of you who plan on doing monster theme parties for your little one, know this. I looked everywhere for monster stuff. No one has it! We went to Party City and the party sections in all major department stores (Target, Walmart, Meijer, etc.), and we found zilch. I eventually found some party favors at Oriental Trading, who, frankly, has everything. So it ended up working in the end, but maybe I'll say that's why I made everything. Yeah, that'll be my excuse.

These are the invitations I mailed out. I used my Mini Monsters cricut cartridge and some of my favorite embellishments. It was a pretty simple design, which I liked about it. I'm trying to get more streamlined in my designing. As you can see, there were 3 designs, and this theme went throughout the whole party. Again, as I like to protect the innocent, sorry for the little black boxes, but this time I'm protecting myself. So deal with it.
So I got my RSVPs, and all Joey's little friends came. We had our 3 friends from playgroup and our next door neighbor. It was crazy! We had 4 small children running around the house along with their 4 dads. So, basically, I guess you could say we had 4 small children and 4 big children running around like hooligans. It was a blast, but we were all pretty bushed after that.

I made us a party banner because I wanted. :) Parties need a banner, right? I used the same papers I used with the invitations, and, of course, the theme came through in the banner. The H at the beginning had monster horns, and the y at the end had dragon wings. I tied the ends up in pretty bows, and it looked like something out of a magazine. It really did. Sorry, but I can't be modest on this one. :) It looked great.
On top of that, I made some cute little party favors for the little kidlets, and I made Joey's shirt. I decorated some chinese takeout boxes, which are, by the way, the best party favor boxes there are. If you want to make a big impact at a party, use chinese takeout boxes. Each kid got a little monster rubber ducky and a monster beach ball. I made Joey's shirt with my cricut and some fabric spray paint. I made stencils for each spray paint color using my cricut. It took a little bit of time because you have to wait for each color to dry before you spray a new one, but it was totally worth it. I will definitely have to try this one again. Simply Spray is the best stuff there is. It dried on the shirt as if it was part of the shirt. It didn't get all rubbery like most screenprinting does. I did totally goof up the first one I tried, though so if you're going to try this yourself, you should buy at least 2 shirts. I ended up buying 3, and now I have an extra shirt to stencil something else. You really can do anything with the cricut. I stenciled "AaarGh!" on the back of the shirt over his butt. I thought it was cute. :)Joey's birthday really was a whirlwind from the very beginning. I had planned on making thank you notes that matched the monster theme, but I just ran out of time and gusto. I had a blast, though, and I would do it all over again. Now I just have to try to top this next year!

Monday, February 14, 2011

Happy Valentine's Day!

I realize it's pretty late for a post pertaining to the entire day, but I had to get this up here before tomorrow! Oh, and I had a really busy day with my valentines. :) I have a new one this year! Joey and I had a great time while Scott was at work. We played a ton, had snacks together, and then we went shopping at Target. We got some birthday presents for him (I told him to act surprised), and we got some valentine presents for Scott. After that, we went to Party City to look for party things for his birthday party. Did you know they have nothing for a monster theme? I don't understand it. They didn't even have licensed monsters or scary monsters. No monsters at all! What kind of place is this?!

Anyway, I did make some valentines this year. We don't normally do the Valentine's Day thing because we're anti-Hallmark-holiday people, but everything really is much more fun with kidlets. So I had to make some valentines to send out with the ones Joey colored on! We picked out some Spongebob valentines because we like Spongebob, and Joey does, too, believe it or not. He'll sit and actually watch it. Hurray for bright colors!

I will be the first to admit, my cards were made kind of last-minute because Valentine's Day really snuck up on me. I do really like some of them, though. Others you probably won't be seeing again. In any case, happy valentine's day, they're awesome.
In case you can't tell, I love taking pictures of my cards all stacked up. They look so awesome in a huge pile! It's like when you think about swimming in a huge pile of jellybeans or zebra cakes or something. So then I had to take a picture of mine with the spongebob cards Joey colored on. You know, though, it just occurred to me that I should have taken a picture of his colorings. That would have been much cooler. Damn. Maybe next time.

For now, everyone have a happy, happy day. Know you're loved!

Thursday, February 10, 2011

Baby Shower #1

This must be the time to have babies because we know 7 families having babies! It's ridiculous. I feel like I'm missing out on something. I'm not ready to go there again, though. I love my Joey, but I remember that experience like it was yesterday.

In any case, I finally got around to blocking out some address and other sensitive info to protect the innocent, blah, blah, blah, and now I get to show you the pictures! For my baby momma sister-in-law, I made the invitations for her baby shower. She has the good fortune of having a pretty cool nickname (Jenny Bee) so I had a great time making the bee the center of the theme. I love bees myself so I definitely had the materials for this one! I made it nice and neutral because gender is unknown (but not for long!). Yellow and grey is one of my personal favorite color palettes. :) As you can see, there's a super adorable bee as the feature element, but that's not any ordinary bee... It's a bee stamp that originally came holding a flower. I masked the flower out and added the umbrella. I know, I know, pretty cool, huh? ;)

I also used glitter! Those who know me will be saying what?! Rayna used glitter?! I know, it's the herpes of craft supplies. It gets on everything, and you'll find it a week later in your underwear. I think I used it pretty well, though. I just put a bit on the edge of the wings to contribute to some translucence. I had a ton of fun doing some watercoloring (one of my new favorite things to do), and I added the cool little embellishment on the bottom. I cut out the envelope with my cricut, curled some wire and cut out the little green flower with my cricut also. I thought the green was a nice little pop of color. It's only in the second picture, but the envelope was for the little heart that has the registry information. I love that part. :) Ooh, I also printed the envelopes so the typeface would match the invitations. It's the little things that really make a project!

In addition to the invites, though, I always have to make something. Especially for family! I usually have a formula: clothing, toy, blanket. I had to deviate this time, though because I just didn't have the time. We still just moved into our house so we're kind of overloaded with all sorts of house stuff. It's slowly getting better, but, I swear, it never ends. Anyway, I did make the toy because I saw this bird and decided they had to have it! I've also been wanting to make this hat for a while. So that's what I ended up doing.

The bird came from a book I got for Christmas called Knitwit. I LOVE it. It's got all sorts of weird critters in it, and I can't wait to make myself something! Of course, there are some things I'd like to make for Joey, too. I want to make him the alien pirate. :) I did end up changing the eyes for the bird because I liked my way better. :) I very often change a pattern to suit my own style. I think it came out much better! It was really fun to knit, though and took very little time. I also changed up the pattern for the hat because they had you knitting just a square bag, which is cute, but the flour sack version is cuter. So I had to improvise a little bit, but I think it turned out well in the end. :) That one came from Closely Knit, which is one of my favorites. I've got a long list of things to make from that book. I'm actually in the process of making something from that book right now! I'm making a sweater vest for Joey for his birthday, but that's another blog post...To top all that off, I made her Thank You notes. No, this was not a preemptive move. I made sure to tell her I was not expecting one back. :) And, to be absolutely clear, she asked for them. So there. They don't match the bee theme, but I also have a soft spot for elephants (check out my shop ;)) so I couldn't pass up this pattern. I used a new technique on these cards that I couldn't believe I had never tried before. I colored the images with chalk and then set it with a fixative. It took no time at all, and it looks great! I might be using these thank yous for myself also. ;)
I'm working on a TON of stuff so keep an eye out! I'll try to keep up with everything! Happy Crafting!

Saturday, February 5, 2011

Like a MoFo!

I have been crafting like crazy, and, honestly, it's been nice being busy making stuff. I've finished up a load of stuff that I need to be getting on here soon, but, for now, I'm going to stick with the easy stuff. :) I've been making a lot of cards, which is awesome! I had been in papercrafting purgatory for a while unable to make anything due to our transitory existence in that creepy hotel. No, not The Shining creepy, but when you've lived in the same hotel for 5 months, nothing seems normal anymore. We're slowly getting back to that normal state. Slowly. I had a ton of thank yous to send due to Christmas, wedding anniversary and my birthday so I had some fun making some of my own. :)


I love the bird thank you card. I was able to do some quick japanese stab stitch on that one to add a little extra oomph. Mostly, I was just experimenting, but I had a great time. I was amazed Joey even let me work for a little while! On that note, I need to do some maintenance on my shop. It's been such a long time since I was able to sit down and do some work for my little stationery shop. :) I miss it! So, watch for these! There are also some other new things I'd like to add to the shop, but my little Joey will be 1 in a week and a half! Wow, I can't believe that... yikes.

In any case, we're having a party!!! I'm planning the whole thing and trying to come up with some clever ideas for decorations and favors and such. I already finished the invitations and got them out, and they're adorable, of course. Our theme is monsters. Now I have to make a banner, some cupcake toppers and get some favors together. I can't wait! I love parties. :) And this one's mine! Well, watch for more. I'll try to keep things updated. :)

Oops, forgot one. This one was super fun to make because I used 4 different stamps (from the same set so it would still look cohesive) to make this pattern. Making paper is one of my favorite things to do, and this is really something new for me. I make my own patterned paper all the time using a single stamp, but I've never piece something together. I had to take a picture of it so I would remember just how I pieced them together for this one. :) I love how it turned out! I also love putting a little something extra on the envelope. When you get an envelope like that, you know there's something awesome inside. :)