Showing posts with label ehle. Show all posts

Wednesday, March 20, 2013

Adventures in Chalkboard Paint

I have ALWAYS wanted to use chalkboard paint. I see it on the DIY network, Martha Stewart crafting ads (I get her craft a day newsletter) and in various Michael's or JoAnn's crafting project ideas. So now it's my turn! Unfortunately, I did not end up getting Martha Stewart's chalkboard paint as it was 2 ounces fewer for $1 more. I got the folkart brand (a very well-known acrylic paint brand), and it worked just fine. I imagine there's only so much that can go wrong with paint so I didn't even think about it. Anyway... on to the project!

We have some baking ingredient jars on our counter, and they needed a little jazzing up. Plus, I always have to look really closely to distinguish the flour and sugar. It sounds stupid, but it's a problem for me. I'm blind as a bat. I bought some pre-cut balsa wood circles (3.25" diameter) for $0.29 each to fit the lids of my kitchen jars. I got my chalkboard paint for $6.99. I used contact paper to mask off a slightly smaller circle in the middle of each balsa piece, and then I just painted 6 or 7 coats of the chalkboard paint. The balsa really soaked up that paint so it took a couple days for me to get all my coats on. I adhered each circle to the lid with 3-D glue dots so they can be removed (if necessary, but they probably won't) but the intention is for them to stay there forever. I like to plan my options.
This was a really quick and easy project that you could do for any room. I painted a couple extra chalkboard labels to use in my craft room. Now I can change out the contents of each jar, or, as is the case with my granola (maple pecan here... yum...), I can get different flavors. And I will never mistake the flour for the sugar again.
 Now... how else can I use my chalkboard paint...?

Monday, January 28, 2013

Update Your Mangy Ironing Board

Okay, so maybe your ironing board cover isn't mangy, but mine certainly was. So I fixed it.
How do these things get so dirty, anyway? I've never ironed anything but clean clothes. Anyway, here's a nice easy, maybe a little dirty, tutorial for you to use when you'd like a little change on the ironing board.

Ironing Board Cover Tutorial

Materials:
* Measure your ironing board to get an idea of how much fabric you'll need.  Mine is 56" long so I just got 2 yds.
*1/8" cord
*toggles for the cord
*coordinating thread
*ruler
*water soluble pen

Remember to always wash your fabric before sewing.

1. Remove current board cover and inspect underlayment to make sure it’s still usable. If it’s not, you’ll have to get something to replace it. Mine was foam, and it's fine. Awesome.

 2.  Lay fabric down on top of your ironing board facedown making sure to leave a few inches around the edge of the fabric. Trace around the ironing board with your marker.
  • If you wanted to make a paper pattern that you could use whenever you wanted, you could do that, too. The following steps will be the same, you'll just use paper.
3. Lay your fabric down again (right side down again) and mark around your traced pattern at 3”. This will give it room to hang down around the ironing board and for you to make your casing for the cord. 
4. You can connect the lines if you want (I did). I know it’s a weird shape, but if you spaced your 3” marks close enough together, it’s just like connecting the dots. Cut out the shape.

5. Place the fabric right side down. Mark in at ¾”. Mark in and pin/press at ¼”.

6. Pin/press again at the marks you made at ¾”. Yes, you will have some gathers around the corners, but just press them down (hospital corner style) and sew right on top of them. 
  • You can see where I've already pressed and pinned the 1/4" section (on the right side of the photo). Then I went back and folded the fabric again to the 3/4" marks (on the left side of the photo).
7. Mark a 1” space at the very point of the pattern for a spot where you can insert the cording. Do not sew this part closed!

8. Sew as close to the inside pressed hem as possible. I always like to press my hems when I'm done so they look nice so you can do that, if you'd like.
9. Attach a safety pin (or elastic threader) to the end of your allotted cord length and thread it through the casing where you left your opening. Make sure you’re threading the cord through the casing entirely. That probably means you’ll have to go back and straighten out the fabric where’s it's bunched up because of the cord going through it. This will make it easier to tighten it at the end.

10. Put your cover on your ironing board and pull the cord tight making sure the cover surrounds the board on all sides evenly so you don’t have any weird bunches or wrinkles.

11. Thread the toggle on the exposed cord on the end and tighten it to bring the cover very close up around the board. 
12. Step back and admire. Maybe have a drink. Mmmm... drinking and sewing...
Everyone needs some teal giraffe print in their lives. Happy Crafting! 

Friday, April 22, 2011

Ladies and Gentlemen, Let the Freebies Begin!

Come one, come all! The day has finally come for our Water for Elephants Giveaway! Huzzah! This was a fun giveaway for me because 1) ECS loves elephants! and 2) I love themes. :) I am a theme hound, and it was really fun looking for supplies to make this week's giveaway. Here, ladies and germs, is what we are giving away in honor of a fabulous-looking movie, Water for Elephants:
Here we have a set of 5 matchbook notebooks with 15 pages of recycled newsprint paper in them. We've got some cycling elephants, some circus poster taglines and the beautiful trapeze artist alongside her elephant pals (her elephant pals are on the reverse side :)). This one has rules just like the last one did so keep on reading!

Rule #1:
Like Ehle Custom Stationery on Facebook. If you already have, fabulous. This just makes it easier for me to find and notify people when they win. Click the link below to be taken to the ECS facebook fan page:
 Also, by becoming a fan on facebook, that's another way to keep up with the doings of ECS like sales, new products and shows!

Rule #2:
Let me know which act it is that brings or would bring you to the circus. I'll start. I love the animals. The boring ones are okay, but mostly I like the dangerous ones. The elephants with their sharp tusks, the lions and tigers with their man-flesh-eating-ness and the alligators who also eat fleshy men. I love the danger in it. :) Now you. What is your favorite act at the circus?

So leave a comment on this blog post telling me all about your circus habits, and I can't wait to read them! Plus you'll be entered in the drawing. :) Also, if you join the Ehle Custom Stationery Ehlebots, there are discussion boards and other ways to get savings and new product reveals. We've just got all sorts of stuff going on!

The giveaway starts as soon as this is posted (if you're reading it now, that's now!) and ends Sunday night. Joey and I will be picking a winner Monday morning sometime so tune in then to see the winner! Just remember: elephants are our friends, R-Pat and Rees are tremendous actors and unfortunately good-looking people, and, hence, you should go see Water for Elephants. :) Ciao, bellas!   

Thursday, March 17, 2011

Etsy Rocks My World: Serpenthes

I got my etsy order yesterday! It's only 1 of 2, but I was really looking forward to this one. You may think it strange that I ordered notecards since I make them, but I do have a couple reasons for that. One, it's no fun making a card and then immediately using it. Second, I love it when I share a hobby with someone. Plus, there are just some people out there with wicked awesome designs. And that brings me to Serpenthes! She has the most amazing illustrations that I just had to buy some cards. I bought 2 sets, and they have the coolest octopus images on them. I still can't believe someone can draw like.
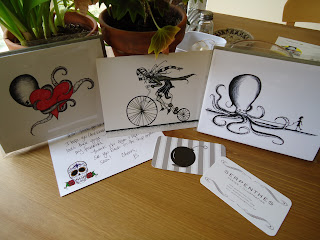
Even the note she sent me has a great illustration of the day of the dead! Even her business cards are a work of art. I was just blown away by what I got. Ooh, she also sent me a free gift! I got the postcard in the middle of the steampunk girl on her bicycle, which was GREAT because I was looking at buying that one, too, but it was only available in print form. I will remind you that one of the great things about etsy is custom orders! Probably about 50% of my orders have been customized for what I want. The octopus with the heart was a regular listing, but I asked for a custom order of the girl walking her pet octopus (that's me, by the way ;)). Serpenthes had a collection called Animal Variety Show that included people and their quirky pets, like this one. While I did like the other ones, I could NOT get enough of that little girl walking her octopus. I had to have it. Lots of it. A whole set dedicated just to them!
Needless to say, I will DEFINITELY be getting more cards from Serpenthes, and some of you will, no doubt, be seeing them firsthand! I've already sent one out. These are definitely some notecards you canNOT get anywhere else! And that's what I love about etsy. Etsy makes you the cool kid in school. :) No one will ever be wearing the same dress to the prom because we got ours from etsy.

If you are interested in some of Serpenthes' artwork, as I know you are after that GLOWING review, check out her etsy shop at Serpenthes' Etsy Shop. She's got some wonderful artwork and notecards, and she has some great invitations. I wish I had known about those octopus wedding invitations and save the dates when I got married. They rock. :)

Also, check out the Animal Variety Show collection! I'm seriously thinking about getting that one now that I have Wanda and Sid. That's what I named them. :)