I don't mean to offend anyone with this title. This just perfectly describes my relationship with sewing and making pretty things quickly and easily. I get bored pretty quickly so it's best if I can make something nice very easily. It has also struck me that this is my first tutorial. Yay! I'm very excited, and I'm sure something will go wrong, but this is a good one to start with. Again, easy.
So our house has these ugly, old, dirty venetian blinds that we never use in certain windows, e.g. our kitchen window above the sink (a). They're the windows that we never cover because they let in awesome light during the day. I tried taking down those ugly venetian blinds and found that underneath them it was even uglier (b). So I had to come up with something to cover them up because there was NO WAY I was going to continue looking at those stupid, ugly venetian blinds just because it was uglier to remove them.
Easy Peasy Valance for Dummies
fabric cut to window (width inside trim + 2in) and (desired height + 4in)
coordinating sewing thread
1" x 2" batten (cut to finished width of window)
(2) 1-1/2" L brackets
staple gun
power drill
tape measure (not pictured)
1.) The first thing I did was cut my fabric to the appropriate size. I added 2 inches to the width and 4 inches to the height. I found it was helpful to label the top and bottom of my fabric so I didn't get confused later. Trust me, it happens.
2.) Stitch a zigzag stitch (or serge, if your machine does that) all the way around the piece to lock in the threads.
3.) Fold and pin both the left and right sides of your fabric in 1 inch on the wrong side. Sew a 3/4 inch seam allowance in a coordinating thread color.
4.) Fold and pin the bottom of your fabric in 1 inch on the wrong side. Sew a 3/4 inch seam allowance in a coordinating color.
And you're done sewing! Wasn't that easy? Now we're going to work on hanging and installing your valance.
5.) Cut your batten down to size. I like to make it about 1/4 inch shorter than the width of my finished valance just so it tucks inside the fabric nicely.
6.) Lay the batten down (with the 2 inch surface down) on a secure surface. Align your completed valance right side up on top of the upward-facing 2 inch surface of the batten (a). Ensure the edges are lined up evenly with the edges of your batten and the top edge of the valance is even with the top edge of the batten. Staple your valance to the batten (b).
7.) Fold your valance over the batten so you are looking at a finished valance with the staples in the back. Lay the valance assembly right side down and measure about 5 inches in from each side of the batten to screw in your L brackets for installation. I always make sure the top of the L brackets go above the batten just a bit so there's extra room for installing it to the inside of the window trim.
8.) Now all that's left to do is install your valance inside your window trim and make sure it's level and even. Or at least as level and even as you want it. :) Just a side note: you CANNOT see the wooden batten from the outside. I checked.
And you're done! Now you can (and should) admire your beautiful handiwork.
Here's another one I did in our breakfast nook. The sunlight's amazing in there, and we NEVER put the curtains (or the blinds previously) down. I also made roman shades out of this same fabric for the other 2 windows in the breakfast nook, but that's a whole different can of worms and a subject for a later date. Happy Crafting!
Monday, June 18, 2012
Friday, June 1, 2012
Yaye! (That's Joey for Coloring)
For Mother's Day, Scott made the mistake of getting me the book 100 One-Yard Wonders, which is a sewing book for the mostly sewing-impaired like myself. So I've already made 4 projects from this book, and I keep finding things I want to make, but I'm having to remind myself to take a chill pill once in a while. I need to do that. I get a new type of project going, and I want to do ALL THE THINGS. So this is me. Taking a chill pill.
Before I decided to cool it, though, I made one of the easier projects in the book because 1) I've been just waiting for the chance when Joey would really be into coloring to make this, and 2) because I had all the supplies on hand. Oh, and it's EASY. Easy is good.
We've also been doing a lot of traveling, and this is an easy way to transport crayons. If all the slots are filled, you'll know if you're missing any, and, if your kid is like mine, Joey just likes taking the crayons in and out of each slot. He's gotten pretty good at it, actually.
The only obnoxious thing about the pattern was, of course, having to stitch all the little crayon slots. It is totally worth it, though, and, of course, the entire point of the thing. And it gives us an excuse to color that much more. So grab your favorite yard of boy or girl-inspired fabric and get crackin'!
Before I decided to cool it, though, I made one of the easier projects in the book because 1) I've been just waiting for the chance when Joey would really be into coloring to make this, and 2) because I had all the supplies on hand. Oh, and it's EASY. Easy is good.
We've also been doing a lot of traveling, and this is an easy way to transport crayons. If all the slots are filled, you'll know if you're missing any, and, if your kid is like mine, Joey just likes taking the crayons in and out of each slot. He's gotten pretty good at it, actually.
The only obnoxious thing about the pattern was, of course, having to stitch all the little crayon slots. It is totally worth it, though, and, of course, the entire point of the thing. And it gives us an excuse to color that much more. So grab your favorite yard of boy or girl-inspired fabric and get crackin'!
Monday, April 16, 2012
Aren't Baby Shoes the Cutest?
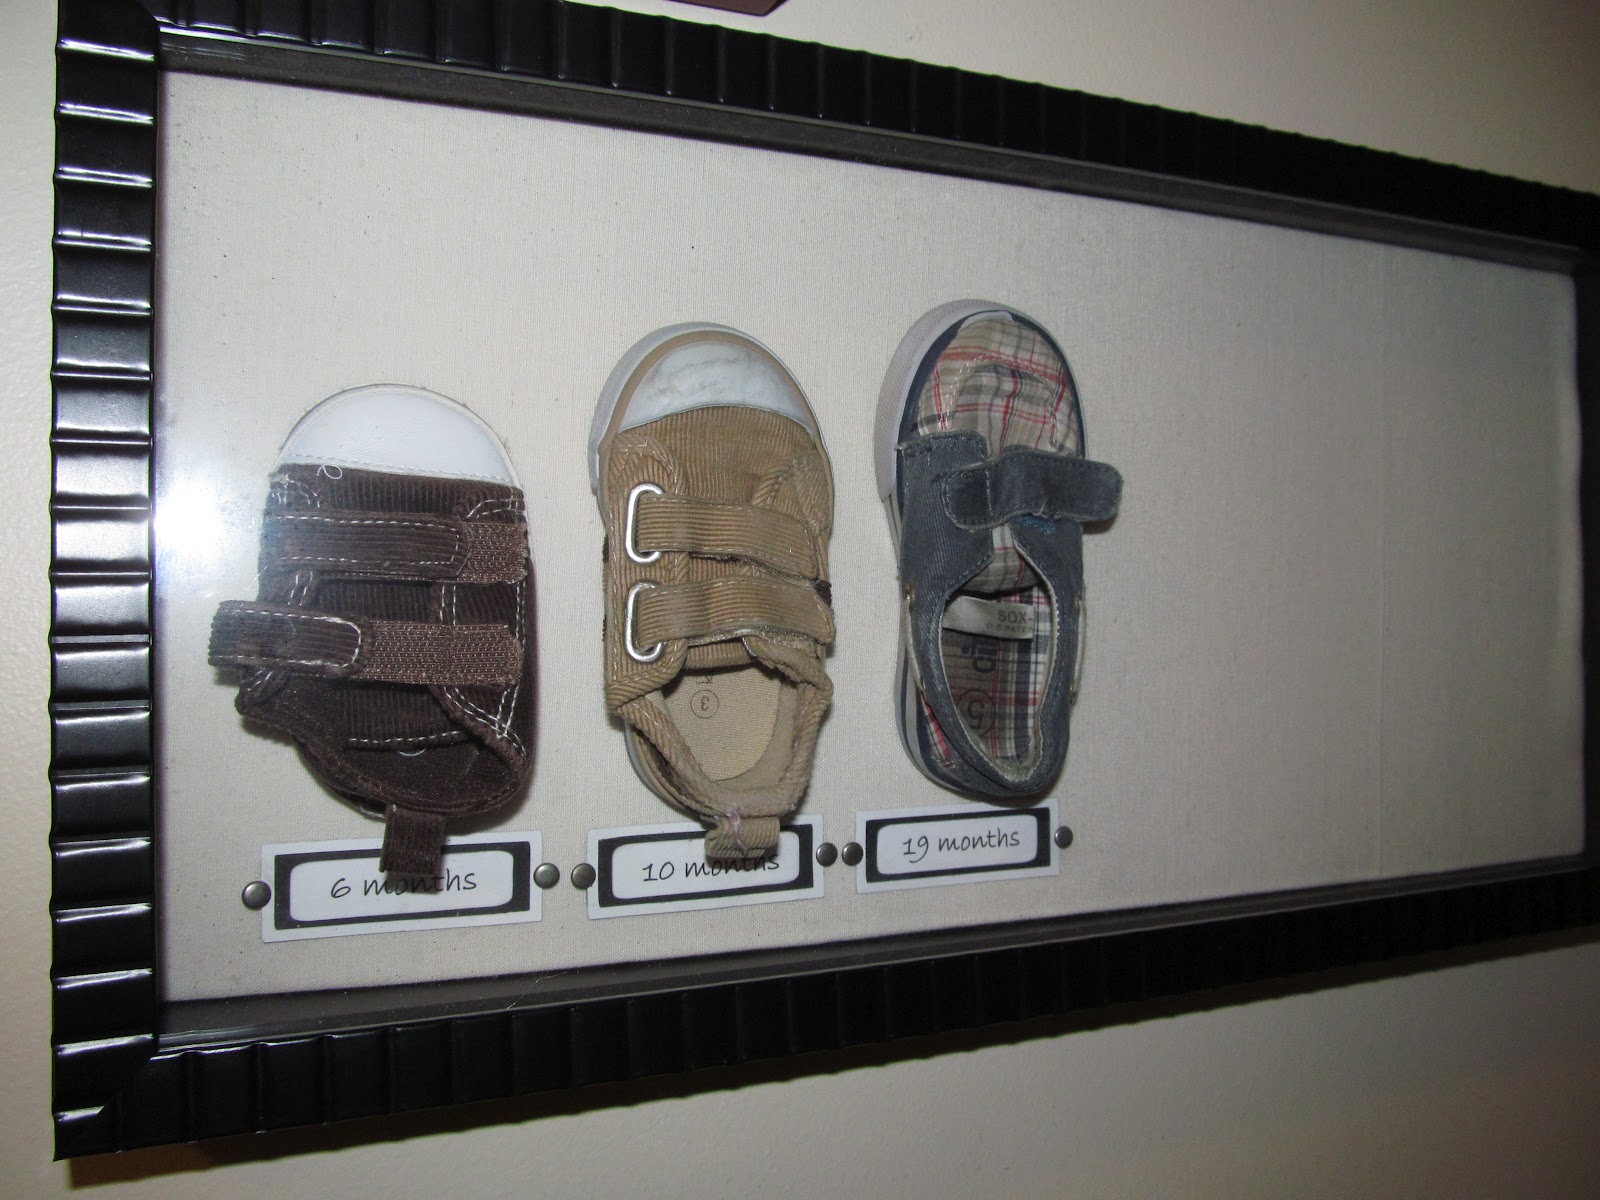
We finally came up with a way to save all those baby shoes we didn't want to throw away: make something artistic with them! Why not? For about Joey's first year, we had a growing mountain of little baby shoes that were too small for him but we couldn't bear to throw them out. I think I saw this idea in a RealSimple magazine, but of course I did it my own way. :)
I went to Michael's and used one of their coupons to get this shadowbox (I never go to Michael's without a coupon...). It ended up being $11 or something ridiculous like that. I thought this was a great shape for all those little shoes, although don't ask me what's going to happen when I run out of room. I haven't thought that far ahead, yet. New shadowbox, maybe?
We decided which shoes we wanted to keep. It ended up being the right shoe from all his pairs of tennies. I printed off the month tag labels with the time he last wore the shoes and used my cricut to cut out the labels. I fastened snaps to the sides of the labels and attached the whole assembly with glue dots. They stick really well to this fabric background on the shadowbox, surprisingly.
Then I used much larger 3d glue dots to adhere the shoes to the fabric shadowbox because they needed something a little stronger. Don't worry about them sticking out any more than they already do, though. The 3d dots don't actually add any height.
So, in the end, we were able to get rid of all the dirty shoes we were keeping and keep something that really reminds us of how quickly they grow.
We've got this cute little baby wall going for Joey, and soon I look forward to making another little shoe shadowbox with perhaps some pink, flowery shoes!
I went to Michael's and used one of their coupons to get this shadowbox (I never go to Michael's without a coupon...). It ended up being $11 or something ridiculous like that. I thought this was a great shape for all those little shoes, although don't ask me what's going to happen when I run out of room. I haven't thought that far ahead, yet. New shadowbox, maybe?
We decided which shoes we wanted to keep. It ended up being the right shoe from all his pairs of tennies. I printed off the month tag labels with the time he last wore the shoes and used my cricut to cut out the labels. I fastened snaps to the sides of the labels and attached the whole assembly with glue dots. They stick really well to this fabric background on the shadowbox, surprisingly.
Then I used much larger 3d glue dots to adhere the shoes to the fabric shadowbox because they needed something a little stronger. Don't worry about them sticking out any more than they already do, though. The 3d dots don't actually add any height.
So, in the end, we were able to get rid of all the dirty shoes we were keeping and keep something that really reminds us of how quickly they grow.
We've got this cute little baby wall going for Joey, and soon I look forward to making another little shoe shadowbox with perhaps some pink, flowery shoes!
Friday, March 9, 2012
FINALLLYYYY! One UFO down...
I can honestly say it feels like a HUGE weight has been lifted off my shoulders. About the weight of a giant double afghan, to be exact. I started this project several, several years ago. I think it was one of the first things I wanted to make Scott after we got married. Yep, that was almost 7 years ago. At least I can say I'm dedicated to my UFOs (for those who don't speak 'craft', that means unfinished object, of which I have too many).
This is a picture of his blanket back when I had "finished" it. I think I just got bored with it and decided that was enough for now. Scott is such a wonderful husband that he never said anything about it, and he used it all the time despite its unfinished potential. :)
But then I FINALLY got to feeling so bad that I decided I need to finish the damn thing. Then I could stop thinking about it and stop feeling guilty and he would have a wonderful blanket to actually use! And I also have made a sort of pact where I'm telling myself that I'm going to lessen the number of UFOs I have and to also stop not finishing them! It's a tall order, I know. I have faith in myself, though. So I'm going back through my stash and trying to finish things I've started way too many years ago and just dropped out of boredom. *sigh*
This was a great way to get started, and Joey, of course, insisted he help. Really, I just gave him a ruler so he'd feel important. :) This was our fringe station, and I kept having to rearrange it because Joey liked stepping on the piles of yarn, but we all had a good time in the end. I couldn't help but laugh. :) It took me several hours to do all this fringe, though. It took me about 5-1/2 hours to do both sides of fringe. That includes cutting all the yarn and evening the trim, though so it was A LOT of work. Glad it's done. :)
This is probably one of the most incredible blankets I've ever made just for the fact that it's a great winter-weight afghan, I love the colors and, with the fringe (which I usually hate) and this lovely scalloped border detail, it really does make a very simple blanket really beautiful. One day, I myself will have a double weight afghan. :) Not now, though. I'm still reveling in the glory of having finished this one. I probably won't be ready to start another regular-person-sized afghan for a while. Ugh.
After I got all my pictures for ravelry and said blog, I went right to where my husband was playing video games in our cold basement and put this on him. And here he is where I am making him enjoy the blanket I just worked SO HARD to finish after a ridiculous number of years. If that doesn't say I love you, I don't know what does. <3
This is a picture of his blanket back when I had "finished" it. I think I just got bored with it and decided that was enough for now. Scott is such a wonderful husband that he never said anything about it, and he used it all the time despite its unfinished potential. :)
But then I FINALLY got to feeling so bad that I decided I need to finish the damn thing. Then I could stop thinking about it and stop feeling guilty and he would have a wonderful blanket to actually use! And I also have made a sort of pact where I'm telling myself that I'm going to lessen the number of UFOs I have and to also stop not finishing them! It's a tall order, I know. I have faith in myself, though. So I'm going back through my stash and trying to finish things I've started way too many years ago and just dropped out of boredom. *sigh*
This was a great way to get started, and Joey, of course, insisted he help. Really, I just gave him a ruler so he'd feel important. :) This was our fringe station, and I kept having to rearrange it because Joey liked stepping on the piles of yarn, but we all had a good time in the end. I couldn't help but laugh. :) It took me several hours to do all this fringe, though. It took me about 5-1/2 hours to do both sides of fringe. That includes cutting all the yarn and evening the trim, though so it was A LOT of work. Glad it's done. :)
This is probably one of the most incredible blankets I've ever made just for the fact that it's a great winter-weight afghan, I love the colors and, with the fringe (which I usually hate) and this lovely scalloped border detail, it really does make a very simple blanket really beautiful. One day, I myself will have a double weight afghan. :) Not now, though. I'm still reveling in the glory of having finished this one. I probably won't be ready to start another regular-person-sized afghan for a while. Ugh.
After I got all my pictures for ravelry and said blog, I went right to where my husband was playing video games in our cold basement and put this on him. And here he is where I am making him enjoy the blanket I just worked SO HARD to finish after a ridiculous number of years. If that doesn't say I love you, I don't know what does. <3
Saturday, September 3, 2011
Underwater Basket Weaving - Turns Out, It's Not That Easy
I was exposed to an entirely new form of crafting last week. One I had miraculously never even considered before: basket weaving. I even drove 5-1/2 hours to try it. IT WAS AWESOME. Yes, it killed my fingers a bit, but it was totally worth it! I went to one of these art classes with my Mom, and we both made baskets.(That's my Mom and me if you hadn't figured that out, yet. Aren't we amazing?!)
An explanation as best I can manage: we wove the bottom of the basket, then we turned up the stakes and wove the top with different kinds of reed. Oh, and we got to cut the tops and do more weaving and then cut more stuff. And we used different colors! My favorite part was the basket feet, though. I LOVE baskets with feet. And also stair baskets, but we didn't make one of those. :( Anyway, as fun as that all sounds, you should definitely try it if you EVER get the chance. I'm pretty sure it won't be my primary hobby (*sad face*), since I have a bazillion other hobbies (how much is a brazilian?), but I will do it whenever I can. (Ooh! That's my basket!)
Actually, today I bought a ton of basket making stuff. I'm amazed at the ways you can use baskets. The basket class was at the instructor's house, and it was fun to find all the baskets she had around the house and all the uses she had found for them. They weren't just baskets. They were magazine holders, tissue boxes, utensil holders, bird nests, hearth baskets and trash cans. Now I want everything to be a basket, and, guess what? I think I can make them all. :)
Sunday, May 15, 2011
New ECS Products! Introducing "The Bunting"
This is something I have always been interested in, and there are so many ways you can make them! Mine, of course, will be made with paper since we are a paperie, and I'm so excited to add them to the shop!
I am one of those people who loves things in miniature (keep your comments to yourself), and these little paper buntings are so cute I had to make one for myself. It does a great job at brightening up my crafting space, which is currently recovering after Hurricane Rayna ran through it. I'd love to get some picture of my craft space up, but that will most likely never happen since I run through my crafting space like a crazy person leaving a trail of cut paper, ribbon and messy adhesives in my wake. Feel free to imagine what it might look like, though. What you can see is the wall I look at when I craft. :) My drafting table is in this corner, and I have access to my crafting lamp and my embellishment center (on the right side of the picture). And then there is the lovely bunting I made for myself out of some of my favorite paper.
These buntings can be made out of all kinds and patterns of paper, and I am currently making them on 5'1" long cotton thread with 1' of blank string on either side for hanging. They can also be tied to skewers on either side and put into a cake! I'm thinking about making a cake just so I can do that. These things are very cool. :)
Go check these out at the shop... Love 'em! *ECS Paper Buntings*
I am one of those people who loves things in miniature (keep your comments to yourself), and these little paper buntings are so cute I had to make one for myself. It does a great job at brightening up my crafting space, which is currently recovering after Hurricane Rayna ran through it. I'd love to get some picture of my craft space up, but that will most likely never happen since I run through my crafting space like a crazy person leaving a trail of cut paper, ribbon and messy adhesives in my wake. Feel free to imagine what it might look like, though. What you can see is the wall I look at when I craft. :) My drafting table is in this corner, and I have access to my crafting lamp and my embellishment center (on the right side of the picture). And then there is the lovely bunting I made for myself out of some of my favorite paper.
These buntings can be made out of all kinds and patterns of paper, and I am currently making them on 5'1" long cotton thread with 1' of blank string on either side for hanging. They can also be tied to skewers on either side and put into a cake! I'm thinking about making a cake just so I can do that. These things are very cool. :)
Go check these out at the shop... Love 'em! *ECS Paper Buntings*
Saturday, May 7, 2011
Happy Mother's Day! And a Sale to Boot...
Good people of the interwebs, Ehle Custom Stationery is having a sale! It is indeed a momentous occasion. :) In honor of all the wonderful mothers out there, we are making our items cheaper! That's always good. This time, it's just for you!
All you need do is go to our online boutique, which you may know very well and you may not, but you can click on the image below to be transported to a world of paper crafting goodness. I've added a lot of stock to get ready for this sale so you should be able to find lots of good stuff. If you see something that is snatched up before you can get it, or if you want a sketchbook made out of paper you saw used for magnets, email me so we can make sure you get the item you want during the sale. The sale is for one day only, and you can only use the coupon code once so I want to make sure you get what you want!
Click on the image above to be taken directly to the Ehle Custom Stationery website. THIS SALE IS FOR ONE DAY ONLY! I don't mean to yell, but that's very important to know. The sale will last the entirety of May 8 give or take a few hours. I think we all know how I am with time restrictions. I'm always fashionably late. Don't wait until the last minute,though... Be sure to use the coupon code mday50 to get the sale. This will save you 50% off your order of $20 or more. You must use the coupon code to get the sale. If you have any trouble, just contact me and we can get things figured out.
Otherwise, I hope you all have a wonderful Mother's Day, and I'm sending all kinds of good thoughts your way. Here's to Moms!
All you need do is go to our online boutique, which you may know very well and you may not, but you can click on the image below to be transported to a world of paper crafting goodness. I've added a lot of stock to get ready for this sale so you should be able to find lots of good stuff. If you see something that is snatched up before you can get it, or if you want a sketchbook made out of paper you saw used for magnets, email me so we can make sure you get the item you want during the sale. The sale is for one day only, and you can only use the coupon code once so I want to make sure you get what you want!
Click on the image above to be taken directly to the Ehle Custom Stationery website. THIS SALE IS FOR ONE DAY ONLY! I don't mean to yell, but that's very important to know. The sale will last the entirety of May 8 give or take a few hours. I think we all know how I am with time restrictions. I'm always fashionably late. Don't wait until the last minute,though... Be sure to use the coupon code mday50 to get the sale. This will save you 50% off your order of $20 or more. You must use the coupon code to get the sale. If you have any trouble, just contact me and we can get things figured out.
Otherwise, I hope you all have a wonderful Mother's Day, and I'm sending all kinds of good thoughts your way. Here's to Moms!
Subscribe to:
Posts (Atom)